Configure Hybrid SSPR with Password Writeback
Short answer
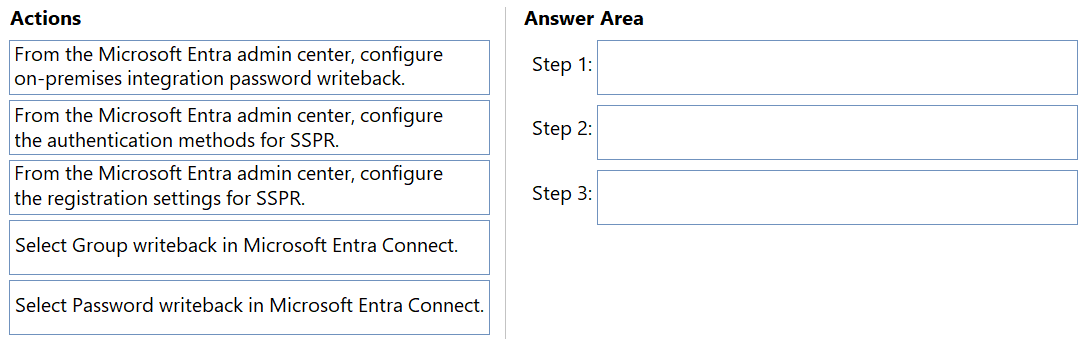
1. Select Password writeback in Microsoft Entra Connect. 2. From the Microsoft Entra admin center, configure on-premises integration password writeback. 3. From the Microsoft Entra admin center, configure the authentication methods for SSPR.
Question
You have an Azure subscription that is linked to a hybrid Microsoft Entra tenant.
All users sync from Active Directory Domain Services (AD DS) to the tenant by using Express Settings in Microsoft Entra Connect.
You plan to implement self-service password reset (SSPR).
You need to ensure that when a user resets or changes a password, the password syncs with AD DS.
Which actions should you perform in sequence? To answer, drag the appropriate actions to the correct order. Each action may be used once, more than once, or not at all. You may need to drag the split bar between panes or scroll to view content.
NOTE: Each correct selection is worth one point.
Key Takeaways
Password writeback must be explicitly enabled in Microsoft Entra Connect before the tenant can enforce on-premises integration policies for SSPR.
Learn the correct sequence to implement Self-Service Password Reset (SSPR) with password writeback to Active Directory using Microsoft Entra Connect and the Entra admin center.
Common mistake: Learners often try to configure SSPR authentication methods or registration settings first. These steps are required for user enrollment but do not enable the actual synchronization mechanism back to AD DS, which requires the initial writeback toggle in Microsoft Entra Connect.
Expert Analysis
To ensure that self-service password reset (SSPR) changes propagate back to an on-premises Active Directory Domain Services (AD DS) environment, the configuration must follow a specific logical sequence: enable the capability at the synchronization tool level, configure the policy at the tenant level, and finally define how users authenticate.
The first step is to Select Password writeback in Microsoft Entra Connect. This action enables the core functionality within the synchronization agent, allowing it to accept and process password updates originating from the cloud. Without this toggle enabled in the connector settings, the sync engine will ignore any password change requests sent from the Azure portal.
Once the feature is enabled in Microsoft Entra Connect, the administrator must navigate to the Microsoft Entra admin center to configure on-premises integration password writeback. This step formally links the synchronization tool's capability with the tenant's security policies, ensuring that the writeback operation is authorized and properly scoped for the hybrid identity setup.
Finally, to allow users to actually perform the reset, you must configure the authentication methods for SSPR (such as email or phone verification). This ensures that users have a verified identity before they can change their passwords, which are then written back to AD DS via the previously configured path.
A common trap is attempting to configure tenant-level SSPR settings before enabling password writeback in Microsoft Entra Connect. While configuring registration or authentication methods is necessary for user experience, it does not solve the technical requirement of syncing the password back to AD DS. The prerequisite for writeback is strictly the activation of the feature in the sync tool itself.
Official Reference
This link opens the official vendor documentation in a new tab.
Exam Strategy
When dealing with hybrid identity questions involving synchronization features, always look for the 'on-premises' or 'writeback' components first. Identify if the sync agent (Entra Connect) has the specific feature toggled on before looking at tenant-level configurations. The physical capability to write data back must exist in the sync tool before the cloud service can utilize it.
Frequently Asked Questions
Why isn't configuring registration methods the first step?
Can I use Entra ID Sync instead of Entra Connect?
Discussion 19 contributions
Compiled from public community threads and reader submissions, lightly edited for clarity. Handles and vote tallies are shown as recorded, and comments reflect the views of individual contributors.
From public community threads 19
-
TonyManero 👍 26This is the sequence: Select Password writeback in Microsoft Entra Connect: This step enables the core functionality of synchronizing password changes initiated through SSPR back to your on-premises AD DS. From the Microsoft Entra admin center, configure the registration settings for SSPR: This allows users to register for SSPR by specifying their preferred contact methods (email, phone) for receiving password reset instructions. From the Microsoft Entra admin center, configure the authentication methods for SSPR: This step defines the methods users can employ to verify their identity during the SSPR process (e.g., security questions, verification codes sent to registered methods).
-
TonyTe0 👍 8Correct answer https://learn.microsoft.com/en-us/entra/identity/authentication/tutorial-enable-cloud-sync-sspr-writeback https://learn.microsoft.com/en-us/entra/identity/authentication/tutorial-enable-sspr
-
sbermejor 👍 61 Password write-back in Entra Connect 2 From Entra configure On-premises integration password write-back See https://learn.microsoft.com/en-us/entra/identity/authentication/tutorial-enable-cloud-sync-sspr-writeback: "With password writeback enabled in Microsoft Entra Connect cloud sync, now verify, and configure Microsoft Entra self-service password reset (SSPR) for password writeback. " 3 Authentication methods in SSPR https://learn.microsoft.com/en-us/entra/identity/authentication/tutorial-enable-sspr
-
Tr619899 👍 5Sorry, I was wrong before, the right answers should be: Steps to implement: Step 1: Select Password writeback in Microsoft Entra Connect. This step enables the password writeback feature in Microsoft Entra Connect, allowing password changes made in the cloud (via SSPR) to be written back to on-premises AD DS. Step 2: From the Microsoft Entra admin center, configure on-premises integration password writeback. This step ensures that the integration is correctly configured to sync password changes back to your on-premises AD DS. Step 3: From the Microsoft Entra admin center, configure the authentication methods for SSPR. After enabling password writeback, you need to configure how users will authenticate and verify their identity when using SSPR.
-
Frank_2022 👍 5Step 1: Select Password writeback in Microsoft Entra Connect (Enable the feature in Azure AD Connect to allow passwords to sync back to on-premises AD DS.) Step 2: From the Microsoft Entra admin center, configure on-premises integration password writeback (Configure the writeback policy in Azure AD to enforce synchronization.) Step 3: From the Microsoft Entra admin center, configure the authentication methods for SSPR (Define how users verify their identity during password resets, e.g., phone, email, or security questions.)
Show 14 more comments
-
sgoncharuk 👍 4I think the first step is to configure authentication methods, not the registration settings
-
Krayzr 👍 3Select Password writeback in Microsoft Entra Connect: This enables the functionality within Azure AD Connect to write password changes back to your on-premises AD DS. This is a fundamental step and must be done first. From the Microsoft Entra admin center, configure on-premises integration password writeback: This configures the password writeback feature in Azure AD to work with your on-premises environment. This step sets up the communication and integration between Azure AD and your local AD DS. From the Microsoft Entra admin center, configure the authentication methods for SSPR: This step defines how users will authenticate when resetting their passwords. This ensures the security and validity of the password reset process. https://learn.microsoft.com/en-us/entra/identity/authentication/concept-sspr-deploy
-
Rohgun 👍 31. Configure on-premises integration password writeback 2. Configure authentication methods for SSPR. 3.2. Configure registration methods for SSPR. i don`t think you need the last step Select Password writeback because this one ist in step 1 - Configure on-premises integration password writeback. But you need authetication and registration for SSPR
-
Tr619899 👍 2To implement self-service password reset (SSPR) and ensure that password changes sync back to Active Directory Domain Services (AD DS), enabling password writeback is essential. Here’s the steps you need to perform: 1. Select Password writeback in Microsoft Entra Connect. 2. From the Microsoft Entra admin center, configure the authentication methods for SSPR. 3. From the Microsoft Entra admin center, configure the registration settings for SSPR.
-
oopspruu 👍 2The express settings don't have password writeback. So the very first thing you need to enable is password writeback feature form AAD Connect on-premise. Then you can come back and define SSPR registration and authentication methods.
-
KakTak 👍 2Steps should be: 1) Select Password Writeback in Entra Connect (We need to enable the feature first) 2) Entra Admin center and configure on-premises integration password writeback 3) Configure the registration
-
aa98333 👍 1Step 1: Seleziona "Select Password writeback in Microsoft Entra Connect"(Abilita la funzionalità fondamentale all'interno di Microsoft Entra Connect per consentire la sincronizzazione delle password modificate nel cloud verso l'Active Directory on-premises). Step 2: Seleziona "From the Microsoft Entra admin center, configure on-premises integration password writeback"(Configura l'integrazione e la policy di writeback direttamente dal portale di amministrazione di Microsoft Entra). Step 3: Seleziona "From the Microsoft Entra admin center, configure the authentication methods for SSPR" (oppure la configurazione dei metodi di registrazione a seconda delle specifiche opzioni richieste).(Definisce i metodi di autenticazione e verifica che gli utenti dovranno utilizzare per reimpostare la propria password tramite SSPR).
-
BigO76 👍 1Sorry no having looking at this in more detail: Step 1: From the Microsoft Entra admin center, configure on-premises integration password writeback. Step 2: Select Password writeback in Microsoft Entra Connect. Step 3: From the Microsoft Entra admin center, configure the authentication methods for SSPR. This sequence ensures: Password writeback is enabled at the tenant level The sync tool is configured to handle password writeback SSPR authentication methods are set up for users to use
-
ikidreamz 👍 1step1 and 3 OK but for step2 i think Auth methods are crucial, once you enable step1 the on-premise integration is only to control from the portal so you dont go back to Azure ad connect wizard to redo it . at least what i understand lemme know what u think Step 2: From the Microsoft Entra admin center, configure the authentication methods for
-
BigO76 👍 1this steps are correct according to the the tutorial link from ToyTe0. authentication config, comes before registration. First, define the methods users can use (authentication methods). Then, enforce or configure how users register for those methods (registration settings).
-
APK1 👍 1Correct answer and sequence should be: Password writeback in Microsoft Entra Connect Microsoft Entra admin center, configure the registration settings for SSPR Microsoft Entra admin center, configure the authentication methods for SSPR
-
Ody 👍 1I think this is correct. When they do the registration, they specify the methods for authentication. An admin defines the authentication methods, but the user specifies what they are going to use.
-
arsh807 👍 11. Configure on-premises integration password writeback. 2. Configure authentication methods for SSPR. 3. Select password writeback in Entra Connect.
-
KakTak 👍 1Sorry, third option should be authentication because registration is ON by default
Reader comments & corrections
No reader corrections yet — spotted an error or have a note? Share it below.
Related Analysis
Practice All MS-102 Questions
Access 111 questions with complete answers and detailed explanations.
View Full MS-102 Practice Test →